How to use these Release Notes
The release notes are organized by solution area. The UC identifier refers to a specific Use Case within the AssetOptics software development lifecycle (SDLC). An explanation of the Use Case and delivered functionality follow. If there are any configuration requirements, they will be listed in the Setup Requirements following the use case explanation. The setup requirements should be used by your system administrator to plan and execute the AssetOptics managed package upgrade.
Asset Management
UC-0453 Update Meter Avg Use APEX Class
Refactored the APEX code that calculates the Meter Average Use value to account for sequential Meter Reading Entries of zero usage.
Setup: None
Inventory Management
UC-0457 Enable Continuous Variables for Inventory Management Quantities
All quantity fields associated with Stock Item inventory management have been updated to allow continuous variables (2 places to the right of the decimal point). Prior to this release, only discrete quantities (integer values) was allowed.
The discrete vs. continuous variable quantities treatment of a Stock Item is specified on the Item Master record. This means that Stock Items will be treated in the same manner across all Storerooms. There is a Boolean attribute on the Item Master record labeled Discrete Quantities. The default value is TRUE.
Additionally, a Total On Hand Quantity field has been added to the Item Master. This enables a user to identify if there is On Hand Quantity in other Storerooms across the enterprise even if they do not have visibility those Stock Item records.
Lastly, a Stock Unit of Measure has been added to the Item Master. The Stock Unit of Measure for all Stock Items associated with an Item Master record should be the same as the Item Master Stock Unit of Measure. There is an optional validation on the Stock Item record that can be enabled to enforce this data requirement. It is turned off be default.
Setup: If you are currently using MRO inventory management, you will have existing Item Master records. All the Item Master records will require updating.
Step 1 – This step will populate the default values to all Item Master records.
Using Dataloader (or other data utility), export all Item Master records to a CSV, update the following fields.
ItemMaster.DiscreteQuantities = TRUE
ItemMaster.TotalOnHandQty = 0
ItemMaster.StockUnitOfMeasure = EA – Each
The Total On Hand Qty will be zero (0) for all Item Master records. The Item Master Total On Hand Quantity is automatically updated when the On Hand Qty for any Stock Item is edited. Step 2 outlines the procedure to manually invoke the code to update all the Total On Hand Qty for all Item Master records. This will be accomplished by exporting Stock Item records, increasing the On Hand Qty by 1, updating the records, and then performing a second update where we reset the Stock Item On Hand Qty to its original value.
Step 2
Export all Stock Item records to a CSV file ensuring you select StockItem.Id, Item Master, OnHandQty.
Using the Data functions in Excel, remove the duplicates based on the Item Master record (you want only one Stock Item record per Item Master.
Add a column to your Excel labeled OnHandQty2. Update the value in this column to equal OnHandQty + 1
Using the CSV file, update the OnHandQty for the Stock Items (matching on StockItem.Id) to equal OnHandQty2
Using the same CSV file, perform a second update updating StockItem.OnHandQty = OnHandQty (original correct value).
When the Stock Item On Hand Qty field was directly edited, the APEX code that updates the Item Master Total On Hand Qty was invoked. Returning the Stock Item On Hand Qty to its original value, invoked that same code a second time to its correct value. This approach results in an accurate Item Master Total On Hand Qty without any data artifacts (junk data).
You must access the data as a System Admin and be comfortable with Dataloader. If you require assistance, please contact support@assetoptics.com BEFORE making these changes.
UC-0459 Add Economic Order Quantity to Stock Item
A new field labeled Economic Order Quantity (EOQ) has been added to the Stock Item. The EOQ represents the minimum quantity of a Stock Item that should be reordered. This is a manually entered value. The default is set to one (1).
The Quantity to Reorder formula field has been updated to include the EOQ logic.
Setup: If you are using MRO inventory management, you will have existing Stock Item records. Update Economic Order Quantity to one (1) for all existing Stock Item records. Afterwards, you can review Stock Item records on an individual basis to update accordingly.
Using dataloader, you can export all Stock Item records ensuring you include StockItem.Id and StockItem.EconomicOrderQty. Update the exported CSV file so that EOQ equals 1 and then use this file to update your existing Stock Item records.
Preventive Maintenance
UC-0456 Update Default Account Assignment to Default Vendor Assignment
Changed the Default Account Assignment field label to Default Vendor Assignment on the PM Schedule, PM Group Detail and PM Route objects. This field is a lookup to the Account object. When a Work Order is created from the PM Schedule, PM Group Schedule or PM Route, the selected Account will be populated to the Work Order Assigned Vendor field. This label change was made to be consistent with the label of the Work Order.
Setup: None
Purchasing
UC-0422 Add Vendor Case Pack functionality to Stock Item
A new purchase order data model has been introduced wherein the PO Stock Item and PO Misc Cost objects have been replaced with a single object, Purchase Order Lines. The Purchase Order Line object uses two (2) record types, Stock and Service that directly correlate to the two aforementioned objects, respectively.
An additional object, Vendor Case Packs (VCP), has been introduced in support of this new data model. The VCP enables you to specify and track multiple vendors from which a Stock Item is purchased along with the packaging configuration (Purchase Pack Quantity, Purchase Unit of Measure, Purchase Description, Vendor Item Number, and Purchase Price). Prior to this release, the Preferred Vendor along with this Purchase Price and Vendor Item Number was specified on the Stock Item record thus inferring that a Stock Item was vendor specific. The new data model removes this constraint.
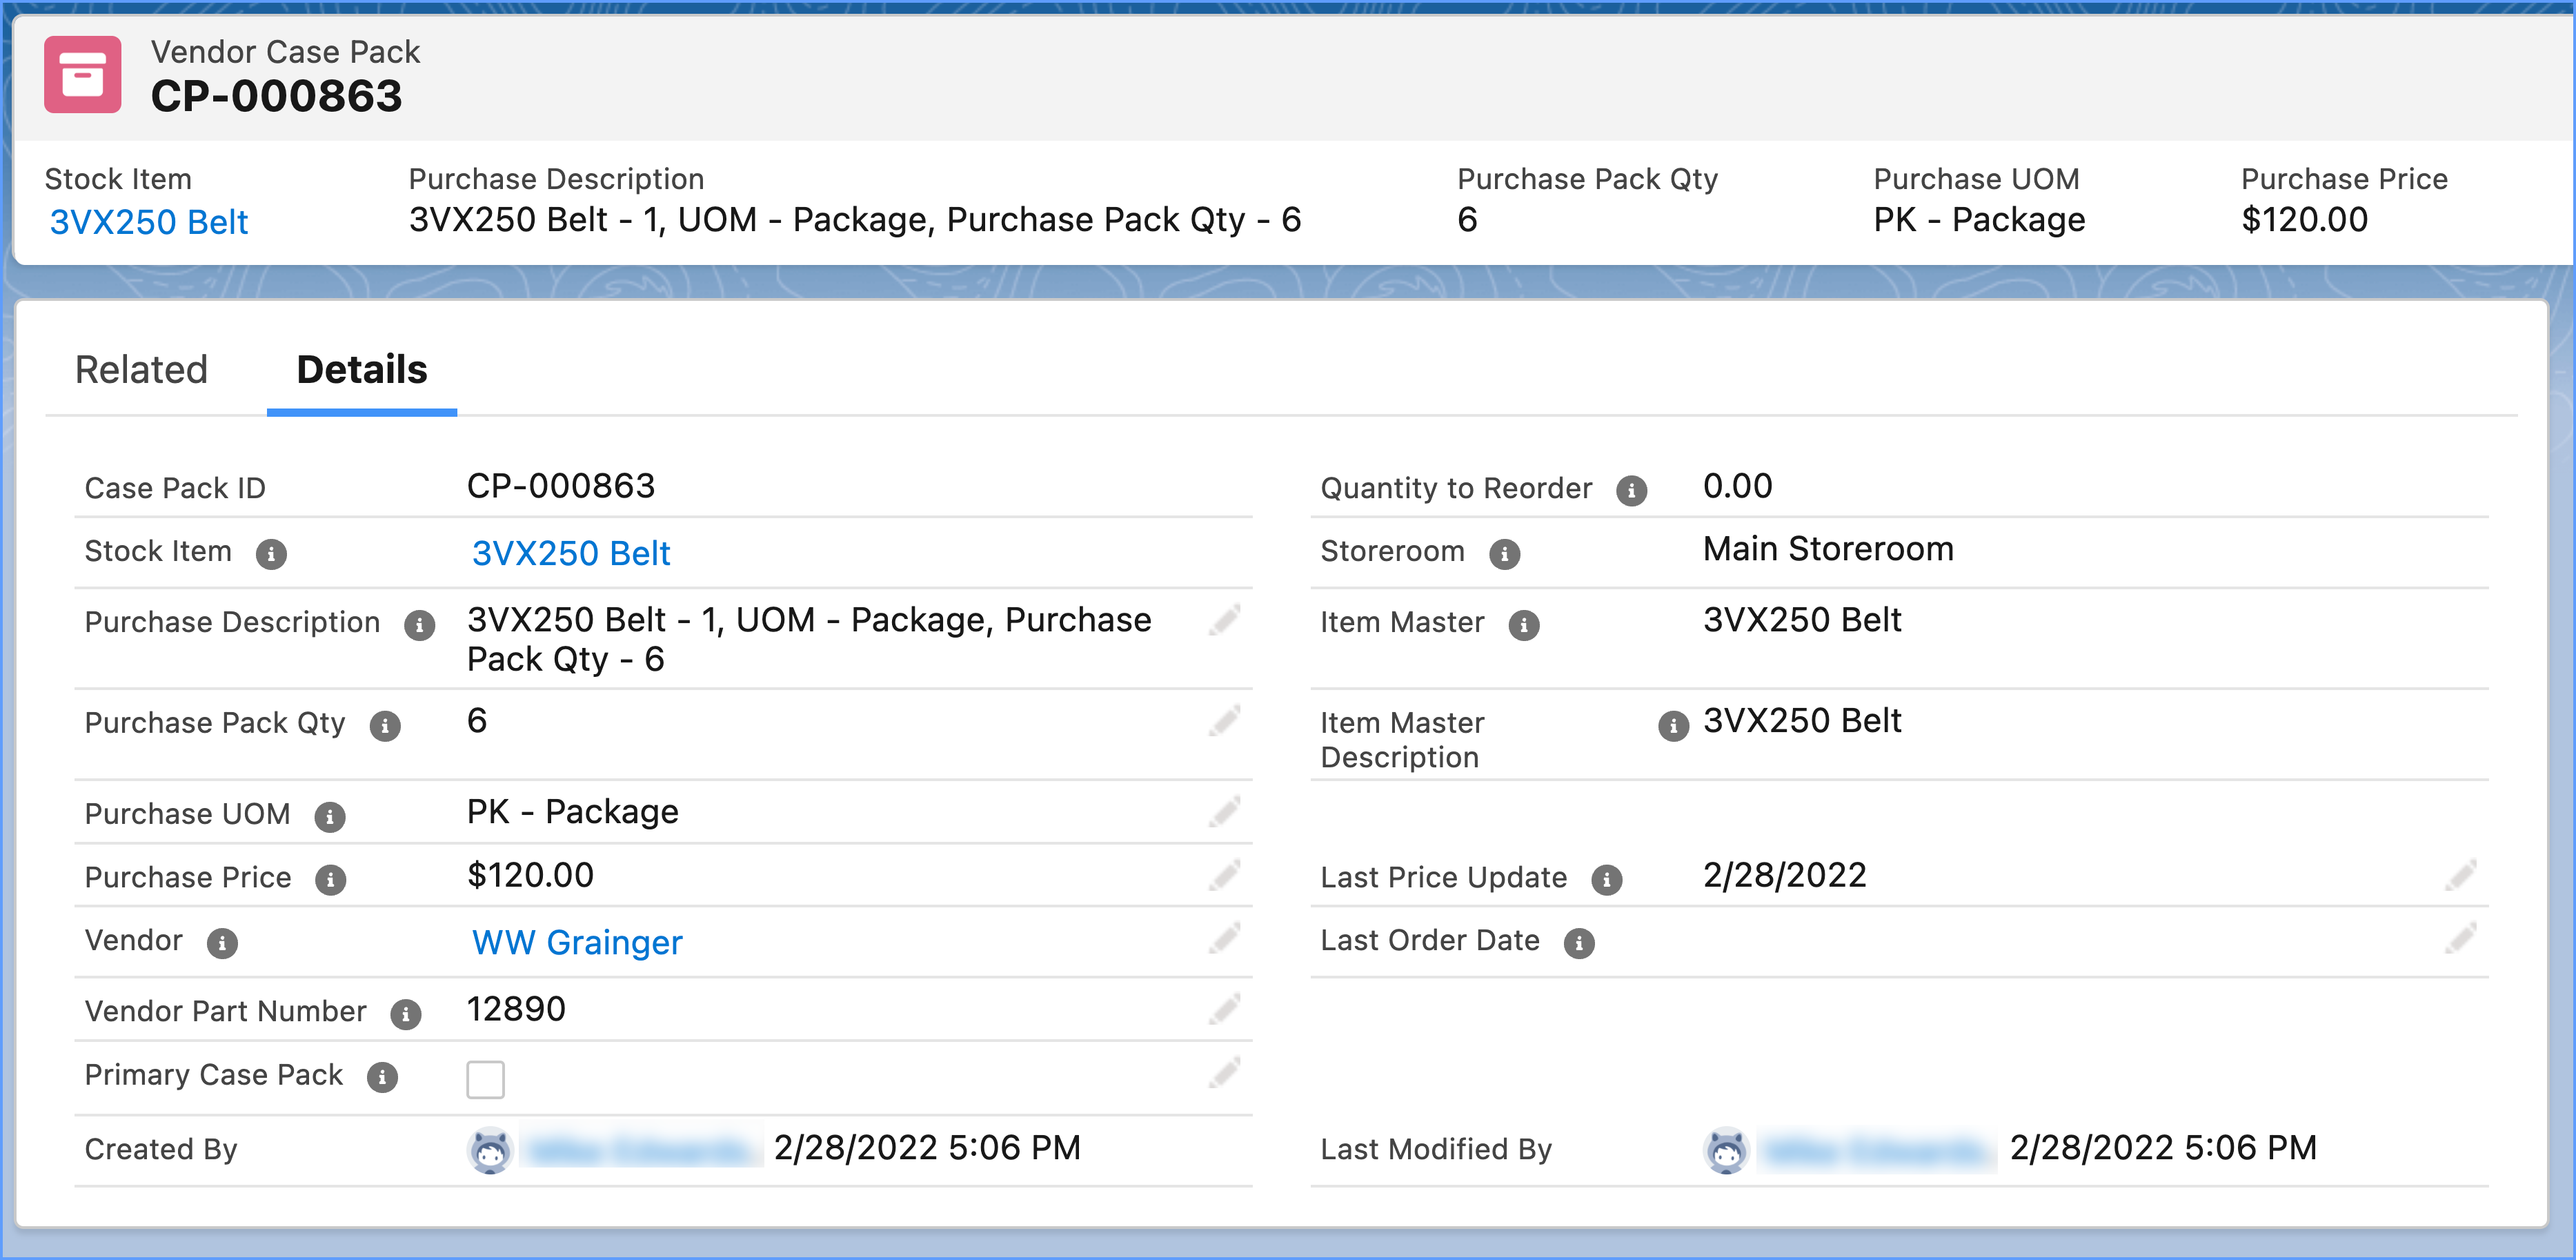
Since multiple Vendor Case Packs can be recorded for a Stock Item, you must specify a single VCP as the Primary Case Pack. The Primary Case Pack will be selected when using the automatic Purchase Order (Requisition) creation from the Stock Item list view or the scheduled batch APEX class. A Quantity to Reorder is calculated for each Vendor Case Pack based on the Purchase Pack Quantity.
Setup:
Vendor Case Packs must be set up concurrently with the deployment of the new purchasing data model. Security must be configured for the new objects and fields. If you are using the standard AssetOptics profiles or Permission Sets, then the package upgrade will automatically apply the new security configuration. If you are using custom profiles and permission sets, these will require update. Contact support@assetoptics.com for further assistance.
Create a Vendor Case Pack for each purchased Stock Item. Export all Stock Item records where Sourcing Type = Purchase and Preferred Vendor is not blank. The fields needed are StockItem.Id, Preferred Vendor, Purchase Pack Quantity, Purchase Price, Purchase UOM, Vendor Item Number. Add a column to your exported CSV for Primary Case Pack and set the value to TRUE for all records. Import this spreadsheet mapping to the VCP object fields accordingly.
UC-0423 Replace PO Stock and PO Misc Cost with PO Line
A new purchase order data model has been introduced wherein the PO Stock Item and PO Misc Cost objects have been replaced with a single object, Purchase Order Lines. The Purchase Order Line object uses two (2) record types, Stock and Service that directly correlate to the two aforementioned objects, respectively.
While the Stock type Purchase Order Line is very similar to the PO Stock object, one key difference is that the Purchase Pack Quantity is now specified on the Purchase Order Line. The Purchase Pack Qty was previously denoted on the Stock Item and thus required that you create a unique Stock Item for every packaging configuration. Purchase packaging configurations are now defined in a new object, Vendor Case Pack.
Note: The new Purchase Order Line does not have the “Receive to Work Order” feature that is available on the PO Stock Item. This was a seldom used feature and may be considered for a future release.
Setup: If you are using the standard AssetOptics profiles (Maint Mgr, Maint Supv, Maint Tech) or permission sets, then no security updates are required. If you use custom profiles or permission sets, access must be provided to the new Purchase Order Line object. Please contact support@assetoptics.com for further assistance.
There are two aspects of setting up the new purchasing data model, the first of the metadata or configuration setup and the second is migrating data from open purchase orders (PO Stock Items and PO Misc Costs) to the new Purchase Order Lines object.
Metadata/Configuration Updates:
Deactivate Flow – Update Purchase Order Status based on Receipts (only considers PO Misc Cost and PO Stock Items – does not consider Purchase Order Lines).
Assign the Purchase Order V2 and Purchase Requisition V2 Lightning record page layouts (by app, record type, profile).
Assign Purchase Order standard page layouts to Ver 3.3 for Order and Requisition.
Update the Stock Item view “Items to Reorder – Purchase Requisition”. Add Preferred Vendor Case Pack <> Null
Update the Stock Item list view command buttons in Salesforce Classic Search Layout. Remove Create PR and add Create POs
Assign 3.3 Stock Item page layout to all user profiles for the Inventory Item record type.
Add “PO Receipt” to the GL Details Type picklist.
Data Migration:
Create a Vendor Case Pack for each purchased Stock Item (UC-0422). Export all Stock Item records where Sourcing Type = Purchase and Preferred Vendor is not blank. The fields needed are StockItem.Id, Preferred Vendor, Purchase Pack Quantity, Purchase Price, Purchase UOM, Vendor Item Number. Add a column to your exported CSV for Primary Case Pack and set the value to TRUE for all records. Import this spreadsheet mapping to the VCP object fields accordingly.
Export all PO Stock Items where Open Quantity > 0. Use this CSV to import Stock record type Purchase Order Lines.
After importing new Purchase Order Lines, update the open PO Stock Lines so that Order Qty = Received Qty. This will create an Order type Inventory Transaction record that will reduce the Stock Item On Order Qty.
Export all PO Misc Cost records where Open Qty > 0. Use this CSV to import Service record type Purchase Order lines. After importing the new Purchase Order Lines, update the open PO Misc Cost lines so that Order Qty = Received Qty.
Work Management
UC-0442 Rewrite Standard Work Task Step and Standard Work Task Trigger Handlers
The APEX logic used to propagate changes from a Standard Work Task to a Work Task have been updated. This logic was previously executed through a scheduled batch APEX class as the CPU and heap size requirements could be high. These updates now occur through a platform event and are near real time.
Setup:
If the ScheduleUpdateWorkTasksBatch APEX class is scheduled, delete the scheduled run.
For all Work Tasks on all Work Orders where Status <> Completed, Canceled, or In Progress, reset the lookup to the Standard Work Task (create a new “Test” Std Work Task, set all the replace all the existing Std Work Tasks with this value and then perform a second update returning the value to its original). This will then copy the Standard Work Task record Id to the Work Task and do the same for the Standard Work Task Steps.
UC-0445 Add Validation Rule to Work Task Step for Model Work Order
A validation rule has been created that precludes a user from adding a Work Task Step directly to a Work Task for Model Work Orders. If you intend to use the checklist like feature found in Work Task Steps on your Model Work Orders, you must first create a Standard Work Task with the appropriate task Steps and then apply that Standard Work Tasks to the Model Work Order.
Setup:
Identify all Model Work Orders that have Work Tasks containing Task Steps where there is no Standard Work Task. Create a report on Work Order with Work Tasks. Filter for record type = Model Work Order and WorkTask.WorkTaskStepCount > 0 and WorkTask.StandardWorkTask = Blank.
Create Standard Work Tasks accordingly.
Installation URL
Please submit a case via the AssetOptics customer community or submit an email to help@assetoptics.com to request the managed package installation URL.