How Can We Help?
Inter-Inventory Location Transfer Orders
Overview
If you manage multiple Inventory Locations where a satellite inventory location (i.e., storeroom) is fulfilled from a primary storeroom, you will process Transfer Orders to replenish the satellite Inventory Location. A satellite storeroom can be a fixed location or a mobile location like a service vehicle.
![]()
There are two types of Transfer Orders: Transfer Out and Transfer In. Product Item inventory is transferred out of the Primary Inventory Location on the Transfer Out Order. Product Item inventory is transferred into the Satellite Inventory Location on the Transfer In Order. Inventory must be first transferred out of the Primary Inventory Location before it can be received at the Satellite Inventory Location. The quantity of the in-transit inventory is visible on the Transfer Order Line as “Shipped Not Received”.
The transfer process is as follows:
- Create a Transfer In Order with Transfer Order Lines for each Product Item.
- Update the Status of the Transfer In Order to “Released”.
- Update the Transfer Out Order Status to “Released”.
- Issue the Product Items on the Transfer Out Order lines by creating a new Transfer Order Transaction.
- Receive the Product Items on the Transfer In Order Lines by creating a new Transfer Order Transaction.
Notes:
- When the Transfer In Order Status is updated to Released, a matching Transfer Out Order will be created automatically and displayed as the “Related Order” on the Transfer In Order.
- The Transfer Out Order Status will be automatically updated to “In Progress” when the first Transfer Order Transaction is processed. When all the Transfer Order Lines have been fulfilled, the Transfer Out Order Status will be automatically updated to “Completed”.
- The Transfer In Order Status will be automatically updated to “In Progress” when the first Transfer Order Transaction is processed. When all of the Transfer Order Lines have been fulfilled, the Transfer In Order Status will be automatically updated to “Completed”.
- Product Items will be issued from and received to the Primary Inventory (Bin) Locations.
Data Setup
A Product Item contains a picklist attribute labeled Primary Replenishment Method that defines where the supply for a Product Item is sourced (Figure 1). The available Primary Replenishment Method values are Purchase and Transfer. If the Primary Replenishment Method is Purchase, then a Purchase Requisition is created for the Preferred Vendor to satisfy minimum stocking requirements. If the Primary Replenishment Method is Transfer, then a Transfer Order is created to satisfy Product Item replenishment.
Figure 1 – Replenishment Details section on Product Item detail page

The Source Location defines the Inventory Location where the Product Item will be sourced for the transfer. The Source Product Item defines the specific Product Item in the Source Inventory Location that will be used to fulfill the replenishment. To lookup the Source Product Item, enter the Source Inventory Location and then invoke the Assign Transfer Source Product Item action (Figure 2). The action-initiated flow will query the Source Inventory Location and return the Product Item with the same Product, Serialization and Condition.
Figure 2 – Assign Transfer Source Product Item action
![]()
Creating a Transfer In Order
The Transfer In order is created against the satellite Inventory Location. The Transfer In order can be manually created from the Product Item list view or automatically created with a scheduled batch APEX job.
To manually create:
- Select the “Products to Transfer” list view from the Product Items tab.
- Select the Product Items using the checkbox displayed in the data grid.
- Invoke the “Generate TO” (transfer orders) action on the list view.
Figure 3 – Manually create a Transfer In order
![]()
The “Generate TO” flow will create a Transfer In order for each Inventory Location and Source Inventory Location permutation adding the Product Items as Transfer Order Lines, accordingly.
Note: The Transfer Order Status default value is set at the Record Type. The initial default value is set to Approved. If you require an approval process for Transfer Orders, update the default value at the Record Type to Request. Create an approval process to update the Status from Request to Waiting Approval and then from Waiting Approval to Approved.
Releasing a Transfer In Order
Note that the initial Status of Approved for the Transfer In order. Also note that the Related Inventory Location is populated yet the Related Order is blank.
Figure 4 – Transfer In Order (Status Approved)
![]()
Update the Transfer Order Status by invoking the “Update Status” action. You will be presented with a choice of valid next Status values.
When the Transfer In order Status is updated to Released, a matching Transfer Out order is created for the Related Inventory Location and is populated to the Related Order field.
Figure 5 – Transfer In Order (Status Released)
![]()
Processing the Transfer Out Order
When a Transfer Out order is created, the default Status is Approved.
There are two steps necessary to process the Transfer Out order:
- Update the Status to Released.
- Issue the stock inventory by creating one or more Transfer Order Transactions for each Transfer Order Lines.
Figure 6 – Transfer Order Line
![]()
You can track the quantity of the stock inventory that has been issued on the Transfer Out order line that has yet to be received on the Transfer In order line. That value is reflected in the “Shipped Not Received” field and is visible on both the Transfer In and Transfer Out order lines.
Figure 7 – Shipped Not Received on Transfer Order Line
![]()
The Transfer Out Order Status will be automatically updated to “In Progress” when the first transfer out transaction is processed. If all the Transfer Order lines have been filled, the Status will be automatically updated to “Completed”.
Receiving Stock Inventory on the Transfer In Order
Stock inventory is received on the Transfer In order by creating one or more Transfer Order Transactions on each Transfer Order Line. Create the new transaction just as performed on the Transfer Out order using the action depicted in Figure 6.
You cannot receive more that is reflected in the “Shipped Not Received” field for each order line.
The Transfer In Order Status will be automatically updated to “In Progress” when the first receipt transaction is processed. If all the Transfer Order lines have been filled, the Status will be automatically updated to “Completed”.
Note: While there are no built-in shipment tracking features, you can easily use Chatter to notify the Satellite Inventory Location recipient by posting a tracking URL in the Chatter feed.
Configuration Notes
Transfer Order Status values are system defined. Do not add to or delete any of the values. The recommended Status flow follows.
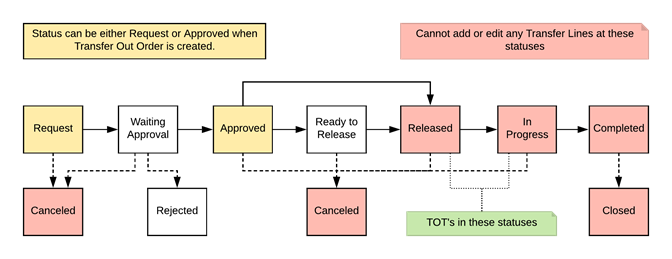
Status updates on the Transfer Order are performed by invoking the Update Status action. This action initiates a flow which evaluates the current status and suggests one or more next status values. The default page layouts contain a Read Only Status field. Do not place the Status picklist field on the page layout and enable users to update the field directly. Unexpected results will occur.
The valid status transitions are managed thru a Custom Metadata Type labeled Valid Status Transitions. Should you require changes to the default process flow, please contact AssetOptics Support for assistance.