PM Routes
Overview
PM Routes provide an alternative to PM Schedules and PM Group Schedules. While the latter enables the creation of a single Work Order linked to a single Asset Tag, the former provides the ability to associate a single Work Task to many Asset Tags along Route Stops and automatically create parent/child Work Orders. The user interacts with the parent (Route) Work Order while the child (Route Stop) work orders are recorded to the Asset Tag’s Work Order history.
Definitions
- PM Routes are used to organize PM Route Stops which are comprised of an Asset Tag and a Standard Work Task. The PM Route contains calendar-based scheduling logic to create and release Route & Route Stop Work Orders in a Parent/Child relationship.
- Route Stops are master-detail child records of the PM Route and contain an Asset and a Standard Work Task. A Route Stop Work Order will be created for each Route Stop and will be the child of a Route Work Order.
- Standard Work Tasks serve as a Library of predefined Work Tasks which may be selected and applied to a Work Order. The Work Task Description, Planned Hours, Instructions and any related Work Task Steps are copied.
- Route Work Orders are associated with PM Routes and serve as the parent Work Order for the Route Stop Work Orders. The user interacts with the Route Work Order; i.e. planning, scheduling, execution, completion.
- Route Stop Work Orders are associated with a Route Stop and an Asset. The Route Stop Work Order is a child to the Route Work Order.
Creating PM Routes
The PM Route contains three key data elements; the Craft to assign to the Work Tasks, the calendar-based scheduling logic, and the default Account and User assignment.
Exhibit 1 – PM Route detail page
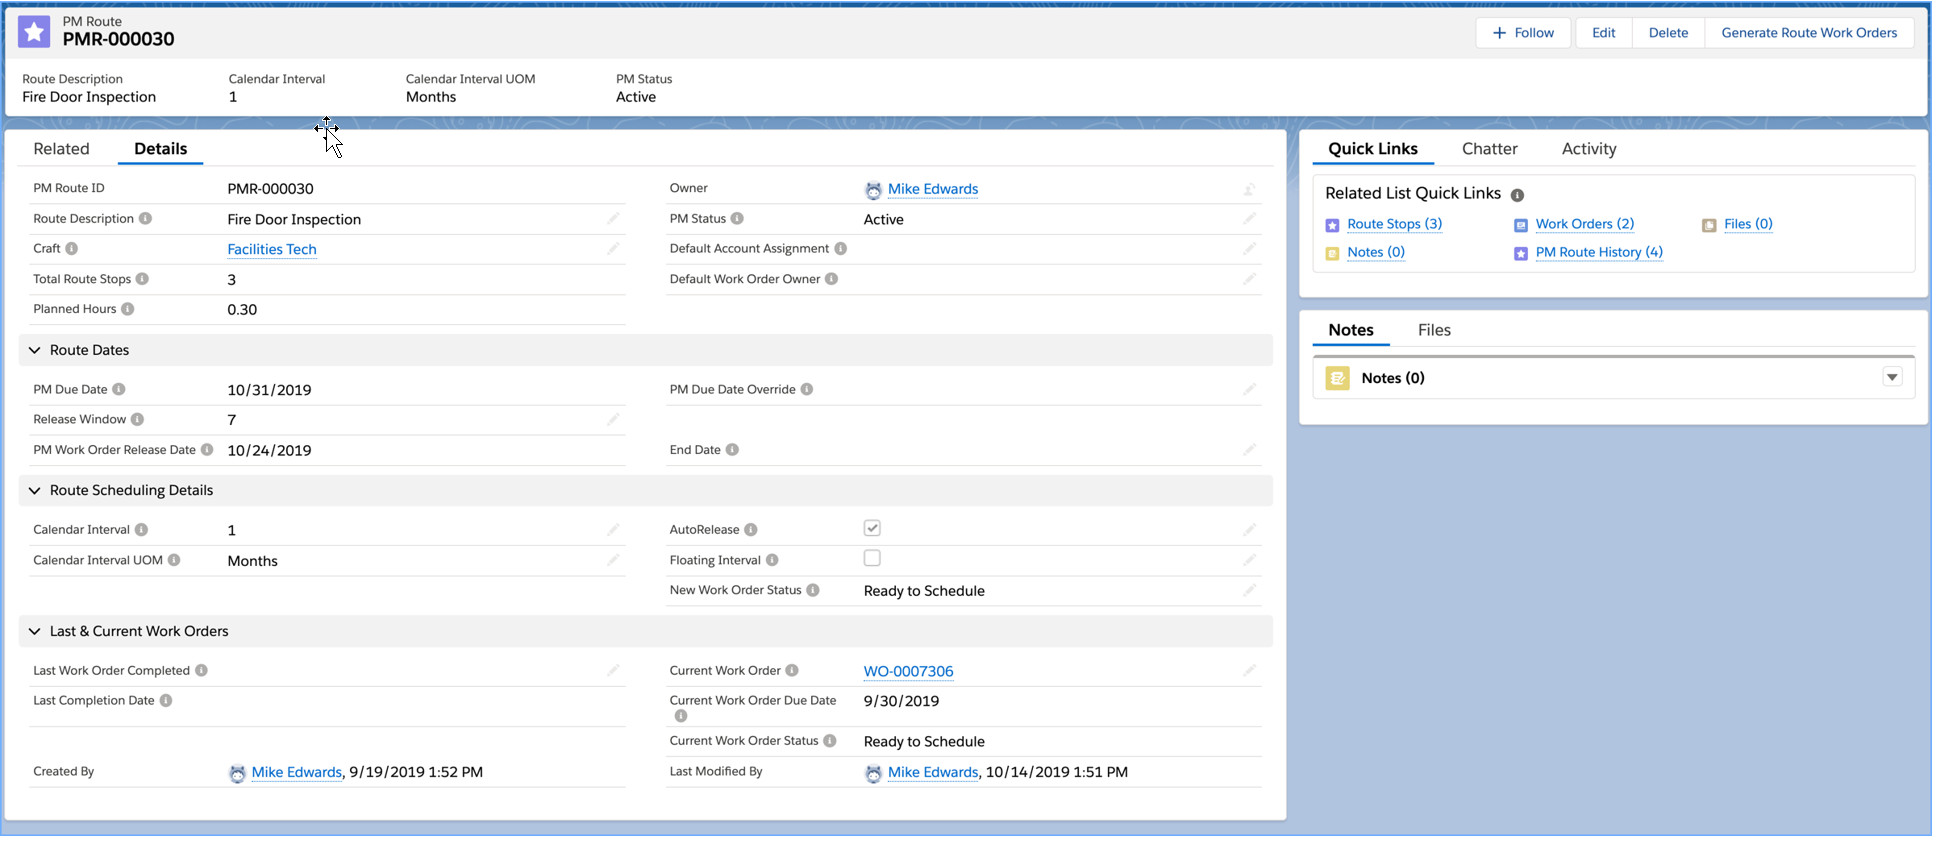
When the Route and Route Stop Work Orders are created, the following data elements are copied:
- PM Route “Route Description” is copied to the Route Work Order Description
- A single Work Task is created on the Route Work Order and assigned to the PM Route “Craft”. The Work Task Planned Hours will be the Route Planned Hours (which is the summary of the planned hours for all of the Route Stops).
- The PM Route “Default Account Assignment” will be copied to the Route Work Order Assigned Vendor.
- The Work Order record owner will be the Default Work Order Owner. If this user is Inactive or the field is blank, then the Work Order record owner will be the PM Route record owner. If the PM Route record owner is Inactive, then the Work Order record owner will be the running user (either the scheduled batch APEX running user or the user that invokes the Generate Route Work Orders action. The PM Route record owner can be a Queue and thus the Work Orders will be owned by the Queue.
- The Work Order Due Dates will be the “PM Due Date”.
- The Work Order Statuses will be the PM Route “New Work Order Status”.
- The newly created Route Work Order will be set as the PM Route “Current Work Order”.
Exhibit 2 – Route Stop edit page
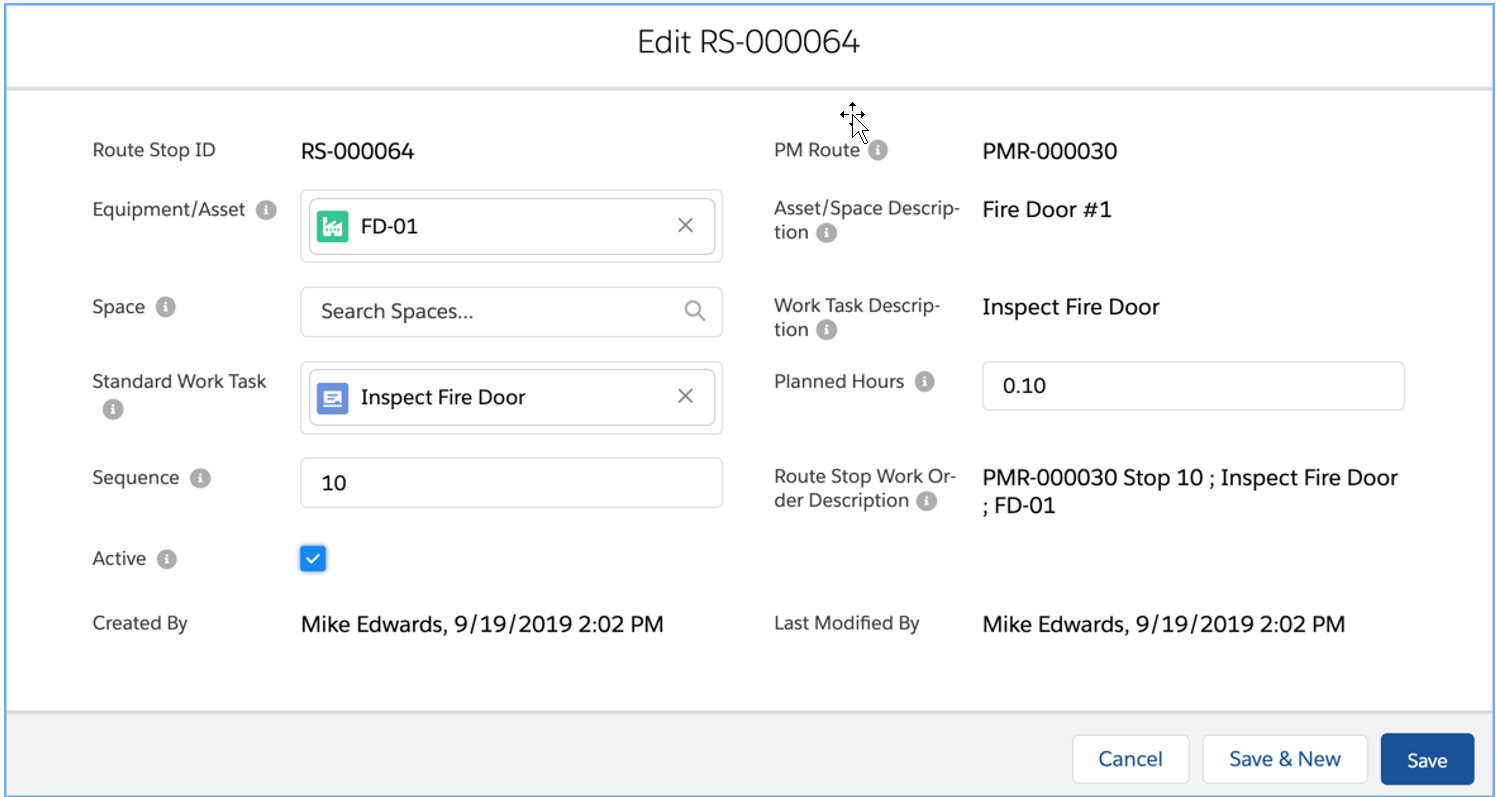
When creating new Route Stops, select the Equipment/Asset OR Space. Select a Standard Work Task and specify a Sequence. The Sequence is used to determine the order in which the Route Stop Work Orders are presented to the user.
The Active field (default = True) on the Route Stop determines if a Route Stop Work Order will be created for this Route Stop. Set to false if want to temporarily inactivate.
Tips:
The number of Route Stops should be limited to an amount of work that a single user would complete in a single work event. While the “out of box” route work order completion flow allows you to complete individual Route Stop Work Orders and resume work where you left off, it is advised that you create PM Routes in manageable sized chunks of work.
If multiple users are performing work and completing Work Tasks and Route Stop Work Orders within a single Route Work Order, the users will need to communicate with one another so that they do not both edit the same Route Stop Work Order.
Generating and Releasing PM Route Work Orders
PM Route Work Orders can be manually generated and released by invoking the Generate Route Work Orders action on the PM Route detail page. PM Route Work Orders can be automatically generated and released thru a scheduled batch APEX job (see the Scheduling Batch APEX cheat sheet for further details).
Two different Work Order recordtypes are used for PM Routes; Route and Route Stop. A single Route recordtype Work Order will be created and will serve as the parent for multiple Route Stop recordtype Work Orders. A Route Stop Work Order will be created for each active Route Stop.
The Route Work Order will contain a single Work Task. This Work Task will be assigned to the Craft denoted on the Route and the Planned Hours will be inherited from the PM Route Planned Hours. Work Assignments should be created against this specific Work Task and not the Work Tasks on the Route Stop Work Orders.
Exhibit 3 – Route Work Order detail page

Assigning and Scheduling Route Work Orders
Work Orders are assigned to Users by creating a Work Assignment. A Work Assignment defines WHO is performing WHAT Work Task and optionally, WHEN they are performing the work.
Work Assignments can be created by invoking the New Assignment action on the Work Order or the Work Task. Work Assignment can also be created using the Dispatch Console.
If you invoke the action from the Work Order, you will need to select the Work Task. Since Work Tasks are auto numbered, you can easily find the Work Task by entering WT in the Work Task lookup search presented in the New Assignment action.
Exhibit 4 – New Assignment action layout

If you invoke the New Assignment from the Work Task, the Work Task will be automatically selected.
The Assigned User is defaulted to the running user from both the Work Order and the Work Task. You can change the Assigned User by clearing the default and selecting another user. The selected Assigned User MUST have an AssetOptics managed package license assigned to their User record.
If you are using the Dispatch Console to assign Work Tasks, the Route Work Order recordtype should be enabled so that Work Tasks from this recordtype will display in the Dispatch Console. Do NOT enable the recordtype for the Route Stop Work Order (refer to Dispatch Console Work Order recordtypes Custom Setting for further details).
Work Tasks from the Route Work Orders can be assigned to Crew Members (users) in the Dispatch Console via drag & drop to the Timeline. Please refer to the Dispatch Console cheat sheet for further details.
Completing PM Route Work Orders
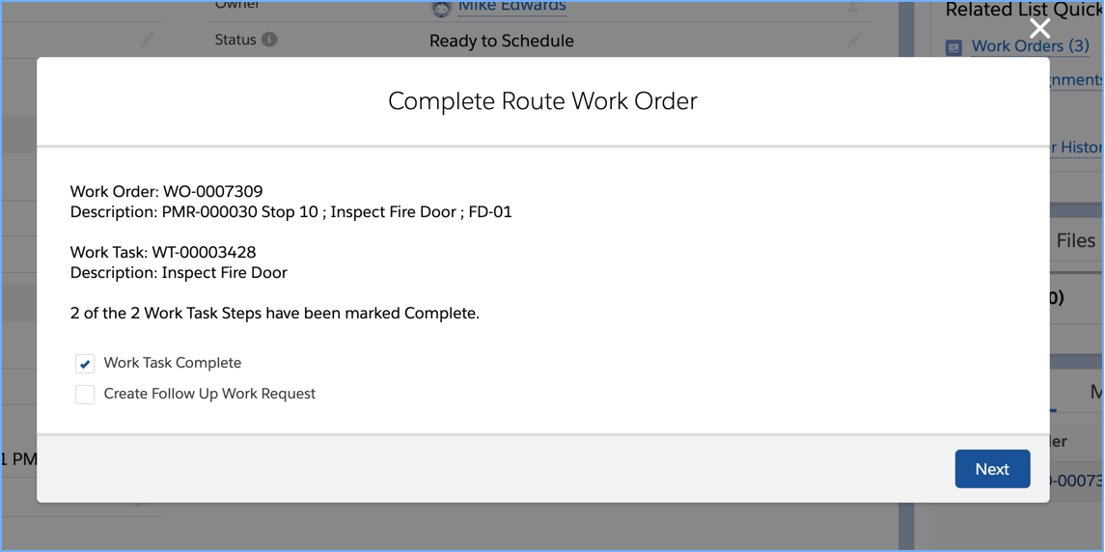
The Route Work Order detail page contains an action labeled “Complete Route Work Order”. This action launches a Screen Flow that will present the user with the Route Stop Work Orders sorted by the Sequence defined on the Route Stops. As you enter a Route Stop Work Order, you will be presented with the single Route Stop Work Task, and if any Work Task Steps defined on the Standard Work Task, you will be looped thru the Work Task Steps where you can mark the steps as Complete and record any comments. Upon completion of the Work Task, you can update the status of the Route Stop Work Order and create a follow up Work Request if needed.
Exhibit 5 – Route Stop Work Order presented in Complete Route Work Order flow.
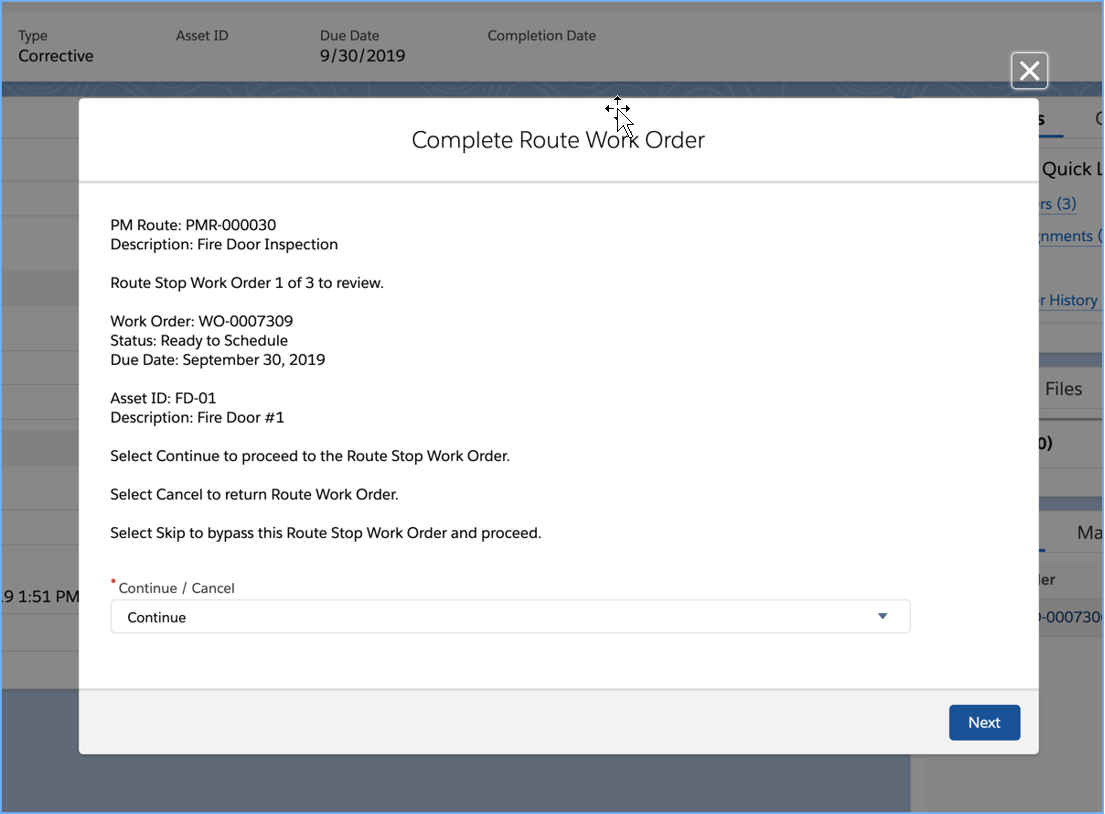
Exhibit 6 – Work Task Step presented in Complete Route Work Order flow.
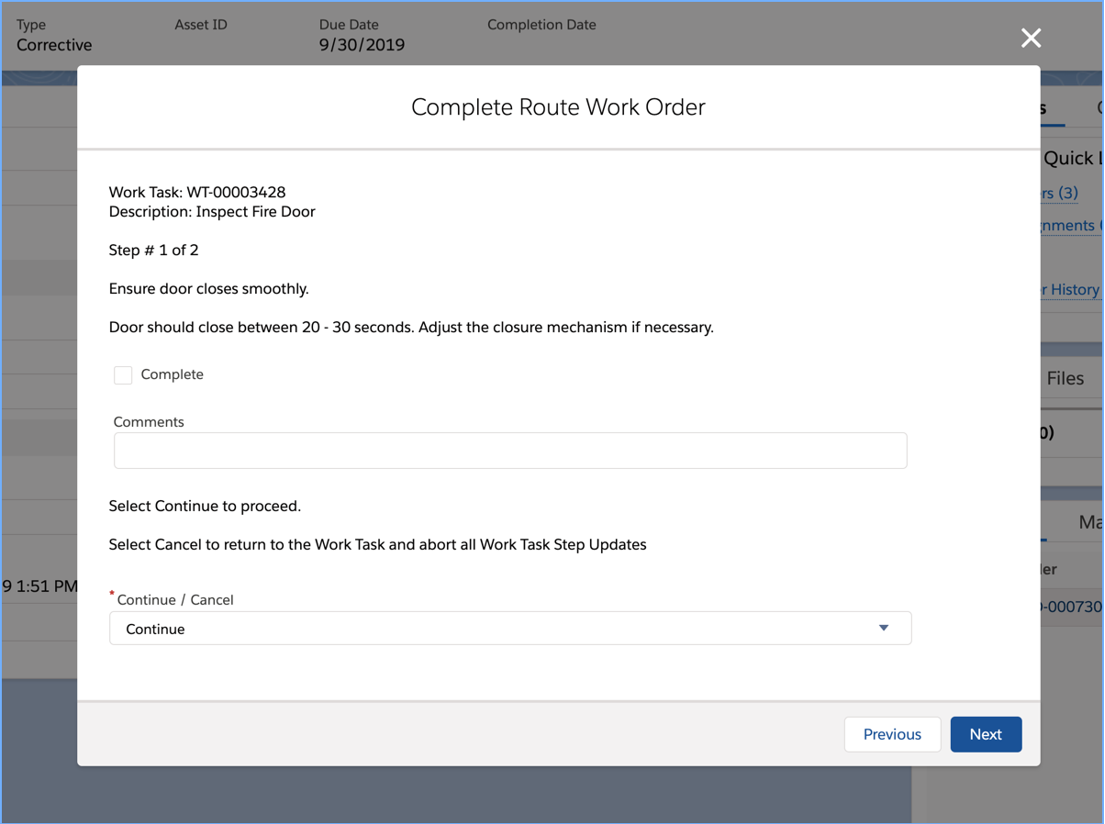
Exhibit 7 – Create Follow Up Work Request presented in Complete Route Work Order flow.
The Complete Route Work Order screen flow is designated as a Template and thus can be cloned and modified to meet your specific process requirements.
Labor hours should be recorded to the Work Task on the Route Work Order.